The Super E-Burner
The Gang Super E-Burner
Installation and Operations Manual
Congratulations on your purchase of the CSS Super E-Burner / Gang Super E-Burner! These products are the fastest PROM/EPROM burners ever made for the Atari 8-bit computer. Their versatile design allows you to quickly burn PROMs and EPROMs ranging from the 2732 (32kB) to the newer 27C010 (1MB). The Super-E-Burner allows you to burn one device at a time, while the Gang Super E-Burner can burn two devices simultaneously It simple cartridge design allows you to quickly set-up your burner without loading software from disk.
Limited Warranty
Computer Software Services, Inc. will REPLACE any product which becomes inoperative through normal use for a period of 90 days from date of purchase. Computer Software Services, Inc. reserves the right to extend this warranty indefinitely should they desire. Due to piracy throughout the industry, Computer Software Services, Inc. does not issue refunds for ANY REASON. Any articles shipped to Computer Software Services, Inc. without a proper return authorization number WILL NOT BE ACCEPTED. Should you have any questions regarding this product or its operation please call between 10am - 5pm Eastern time weekdays. As always, Computer Software Services, Inc. will install any of its hardware products at no charge should you not be able to install it yourself. Please call for details, (585) 429-5639.
ROMs, PROMs, and EPROMs
A Read Only Memory chip, or ROM, is a device that stores computer programs in a non-destructable form. They are found in all computers. The operating system in your Atari 8-bit, as well as any cartridges you may own, are ROMs. The problem with ROMs is that once embedded with a program at a chip factory, they can never be altered.
A programmable Read Only Memory chip, or PROM, is a ROM that can be programmed by a computer user using a PROM programming device. PROMs can only be programmed once.
An Erasable Programmable Read Only Memory, or EPROM, is a chip that performs the same function as a ROM or PROM, but can be erased and reused a number of times. Your Super E-Burner allows you to program both PROMs and EPROMs. Since the average computer user uses EPROMs because of their versatility, our discussion will focus primarily on EPROMs.
EPROMs are identified by a numerical code on the top of the chip. The most common EPROM family (and the one the Super E-Burner supports) begins with the number "27". The "27" is followed by another number that identifies the amount of data (in thousands of bits, or "Kilobits") that the EPROMs will store. For example, if you have a 2764 EPROM, it is capable of storing 64,000 bits, or 64 kilobits of data. Since there are 8 bits in one byte, divide the number of kilobits by 8 to calculate the kilobyte (kB) storage of the EPROM.
Programming an EPROM is called "burning" an EPROM. You do not physically burn the device in any way, but send special electrical signals through the chip.
Notice that there is a small round window at the top of the chip. This is the EPROM erasing window, and is made of quartz. To erase an EPROM, this window must be subjected to 15 minutes of exposure to a strong ultraviolet (UV) light source at a certain frequency. Many companies manufacture EPROM erasing devices. You simply sit your EPROM in this unit, and it will erase it. The Super E-Burner does not erase EPROMs.
EPROMs do not last forever. If you erase and reprogram an EPROM enough times, it will become unusable. This is due to the nature of EPROMs and cannot be corrected. If an EPROM continually fails verification after you burn it, it has reached the end of its life and should be discarded. The number of times an EPROM can be reused depends upon many things, including the manufacturer, age of the EPROM, programming cycles, etc.
How PROMs and EPROMs work
One would think that PROMs and EPROMs work in such a complicated fashion that the average person cannot understand how they operate. This is far from the truth. The following section will, in highly oversimplified terms, describe what happens inside of these devices.
Of the two devices, PROMs are the simplest to understand. Inside of a PROM, there is a grid of wires. Wires that run horizontally are called rows, and vertical wires are columns (this terminology is identical to that used for monitor displays). Where each row and column theoretically intersect, a bit of information is stored.
However, each row and column wire does not physically touch another wire. There is a short bit of wire at each intersection that connects the two wires. Actually, this short bit of wire is a diode or a fuse. In a new PROM, every single intersection point has one of these fuses.
When a particular bit of information is addressed and a fuse exists at the intersection, the bit is a logically "high". For a brand new PROM, every bit is a "high" because every intersection has a fuse. To program a PROM, a PROM burner will burn out the fuse of every bit that needs to be set to a logical "low" by applying a high voltage (10V - 30V) to the special programming pin. Since the fuse is physically burned out, a PROM can never be reprogrammed.
EPROMs are quite a bit more complex. The EPROM still has the grid of row and column wires, but uses MOS transistors instead of fuses. These transistors have two "gates", with one connected to a wire and the other not connected to anything (called "floating"). This floating gate is surrounded with an insulating material. To program an EPROM, a high voltage is applied to the non-floating gate of each transistor that is to hold a logical "low". When this is done, the insulating material around the floating gate temporarily breaks down, allowing a negative voltage to accumulate on the floating gate. When this high voltage is removed, the charge on the floating gate remains. Therefore, a non-charged floating gate is a logical "high", while a negatively charged gate is a "low".
The insulating material around the floating gates has a weakness: it can be made slightly conductive by exposing it to ultraviolet light of a certain wavelength. When this happens, the charge on the floating gate will be dissipated, erasing the EPROM. However, if you expose the insulating material to this UV light too often, it breaks down and becomes permanently conductive. When this happens, the EPROM is useless and should be discarded.
Installation
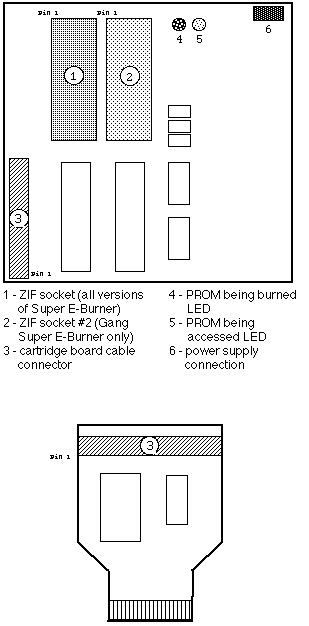
Both the Super E-Burner / Gang Super E-Burner consist of the main burner PCB, cartridge interface board, ribbon cable connecting both boards, and a power supply. The program for the burner is in ROM, and will come up as soon as you turn on your computer. Installation is the same for both devices.
1. Set the main burner board in a convenient, uncluttered area. Never let metal objects rest underneath the burner!
2. Insert the cartridge interface board into the computer with the cable and chips facing you (XL series) or with the cable and chips facing up (XE series).
3. Plug in the power supply.
4. Turn on the computer. The Super E-Burner menu should appear.
Operation
1. Place your PROM/EPROM (called "device" from now on) in the ZIF socket. "ZIF" stands for Zero Insertion Force. It is a socket that puts no pressure on the pins of the device until the device is fully seated in the socket. If you look inside each pin hole in the ZIF socket, you will see two small metal tabs. By moving the lever on the socket to its "unlocked" position, you will find that the two tabs move apart. You insert your device into the socket when it is "unlocked". When "locked" the two tabs will come together, like a clamp. If a chip is in the socket when you "lock" it, the two tabs will clamp onto the pin, resulting in a firm contact.
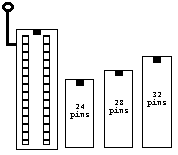
The proper orientation for your device follows. Note that although the ZIF socket on your Super E-Burner may be capable of holding a 40-pin device, the burner does not actually support any 40-pin devices at this time.
2. Upon booting computer, a menu of device types will appear. Along with the device type, each Vpp (programming voltage) and storage (in kilobytes) is listed. Look at the identification number on the top of your device, and match it to one of the selections on the menu. Make sure to match types exactly, including any letters that may follow the "27xxx" number on your device. Some manufacturers will also put number such as "12.5V" on top of the device. This identifies the programming voltage (Vpp) required to program the device. Be sure the voltage value on your menu selection also corresponds to this number. An incorrect selection of types can damage your device.
3. When you have selected a device from the menu, a new menu of operations will be displayed. A description of each operation follows.
[R] - Read EPROM: This will read the contents of a programmed EPROM and save them to a file. You will be prompted to enter a filename and insert the EPROM into the ZIF socket.
[V] - Verify EPROM: If you have burned a device and want to make sure that the device is identical to the file you used to program it, use this selection. You will be prompted to enter the source filename, and to insert the EPROM into the ZIF socket. The two will then be compared and any discrepancies will be reported.
[N] - # of Copies: If you wish to burn multiple devices using the same file, you can set the number of devices to be burned with this option. Simply enter the number you wish to burn. At the top left of the screen, the field ÔCO:Ő identifies the number of copies you will burn. The field "NU:" will identify the how many devices you have burned so far.
[S] - Change speed: This will change the speed at which the EPROM is burned. You will be prompted to enter a number between 0 and 9, with 0 being the fastest and 9 the slowest programming speeds. Most devices can be programmed with the speed set to 0. However, 2732 (no suffix) devices require a minimum speed of 5.
[1-9] - Disk Directory: Does what it says.
[B] - Burn EPROM: This selection does just what it says: it will burn an empty device. You will be prompted to enter the source filename of the file you want to burn into the device, and will be prompted to insert the device into the burner.
[E] - Verify erase: Will verify that the EPROM currently in the ZIF socket has been erased and can be burned.
[Q] - Quit to DOS: Does what it says.
[ESC] - New PROM size: Returns to the EPROM selection menu so you can change device type.
4. The remaining fields at the top of the operations menu screen are:
File: The file you are currently working with.
Prom: If you have the Gang Super E-Burner, this will identify which of the ZIF sockets
is currently in use (1 or 2).
Loc: Current memory location inside the device that is being operated on by the burner.
Write: If burning data into the device, this will show what data (in hexadecimal) is being burned into the current memory location inside the device.
Read: If reading data from a device, this will show the data (in hexadecimal) being read from the current memory location inside the device.
Type: Device type you are currently using.
Retries: If there is difficulty reading or writing a device, this shows how many times the burner has tried to do so.
Speed: Shows speed you selected for the device.
Troubleshooting
Always make sure your device has been fully erased before you attempt to program it. If your device doesn't program or programs very slowly, change programming speed to a higher number. If the device refuses to program, press OPTION to end programming sequence. Older devices may require several attempts at slower speeds, or simply cannot be programmed by the Super E-Burner. Devices that have been programmed and erased many times will become unusable. This is due to the nature of EPROMs. New EPROMS will yield better results.